Monday 21 January 2013

Stained Glass Lighthouse Project

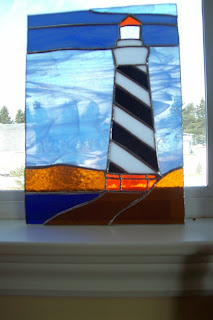
I was very pleased with my stained glass lighthouse project. Especially since it is only my 2nd attempt at stained glass.

I started out with this pattern.
This is a free stained glass pattern so if you would like it just right click and save as.
I started working from the top down. I would cut a piece and then grind to make sure I had a good fit before going on to the next piece. 

I was having a real problem with the diagonal pieces until a friend suggested that I trace the pattern onto a piece of cardboard, then cut the pieces out and lay them on the glass to cut. That little tip made the diagonal pieces a snap. Thanks Darlene!

When I got to the bottom there was a bit more fine tuning to have it all come together with as few gaps as possible but I think I managed it pretty good. 

Here is the finished piece. The top image is the front side of the stained glass project and the bottom image is the back side.


The piece measures 9 1/2" x 13 1/2" You can see that it is a much more uniform piece and the soldering is much better than the first piece thanks to a couple of youtube videos. I think the trick to soldering a nice rounded line is to hold the soldering iron a wee bit off the actual piece and have the solder roll down and off as you move the soldering iron along the line you are soldering. 

Next up will be a stained glass hot air balloon project. Then I would like to do a sailboat and a ship in a bottle.

What I really want to get good enough to do is inset stained glass into mirrors such as a border of shells around a bathroom mirror or a geometric insert into a mirror. The possibilities are unlimited. come back soon to see how the stained glass hot air balloon turns out.

Monday 14 January 2013

My Stained Glass Gallery Welcome

I decided that I needed a new hobby around the end of 2012 and a friend suggested Stained Glass.
I thought it would be interesting since I enjoy puzzles and am always game to try something new.

My husband got me everything I would need to get started in Stained Glass for Christmas of 2012. I read a few online tutorials and watched a few YouTube videos and thought "Ok, now I'm ready to get started."

Pat had included 5 different sheets of glass in my Christmas gift so I had to find a pattern that looked easy and that the glass colors would look ok in. I chose this pattern.
(If you want the pattern just right click on it and then click Save As. It's a free pattern.)
I quickly set to work cutting out all the pieces. (Do NOT do that) It is almost impossible to make the fit properly.

What you will want to do is to choose a spot, the top, bottom or side, cut a piece and then cut the adjoining piece, regardless of color, and make sure that they fit quite snugly against each other and then go on to the next adjoining piece. 

My stained glass rose did not turn out too badly in spite of my mistakes. But we must remember that this is my first ever attempt at stained glass. 

The rose itself was quite difficult to cut as well as the circle. ALWAYS cut the inside curve before the outside! 

Here is my first finished piece of stained glass. 


I think I will have to watch a couple of more videos on soldering so I can get a nice smooth beaded solder. this piece has taught me so much. 

The next stained glass piece that I am doing is a Lighthouse. It does not have the tiny pieces like the rose so I think that will make it easier plus after just 6 or 8 pieces cut and making sure they fit properly I know that it will be a much nicer piece.

Maybe after I do a couple more pieces I will come back and do another rose panel to compare the difference. I will share it with you.